How To Create Plugins
A plugin is a .NET assembly .DLL file that lets you create and add new nodes to Connect I/O. For each node you define inputs, outputs and add functionality through code. These plugins can range from simple logic to complex operations such as interfacing with hardware or third-party software.
Each node must inherit from the CustomNode or CustomNodeAsync class found in the ConnectIO.Plugins.dll assembly. The CustomNode class is the base class for nodes running logic on the same thread as Connect I/O. A good example of such nodes is the down counter (CTD) which executes code that will never block the Connect I/O main thread. CustomNodeAsync is the base class for nodes which will execute logic on a different thread. These nodes are typically used for time-consuming operations that may cause Connect I/O to block or run too slowly. An example would be a node executing TCP/IP communications or a node accessing a DAQ driver. Take care that asynchronous nodes add an overhead to the application execution.
Plugins assemblies must be available on the plugins folder or one of its subfolders to be automatically loaded at startup. For development, it is recommended Microsoft Visual Studio 2015 and .NET framework 4.5.
Node Attributes
Nodes must have attributes to define how they are organized and displayed on the Plugins panel. The nodes are displayed by category, sub-category and name. Category and name attributes are mandatory while sub-category is optional. The Documentation attribute may be used to specify the documentation file (plain text file – txt) for each node.
[Category("Connect I/O Tutorials")]
[SubCategory("CustomNode Examples")]
[Name("ADD")]
[Documentation("ADD.txt")]
Node Sockets
To define inputs and outputs for a node, you must use sockets. There is a different socket for each data type supported by Connect I/O.
| Input Sockets | SocketBitInput, SocketByteInput, SocketShortInput, SocketIntInput, SocketLongInput, SocketFloatInput, SocketDoubleInput, SocketStringInput, SocketDateTimeInput, SocketTimeSpanInput |
| Output Sockets | SocketBitOutput, SocketByteOutput, SocketShortOutput, SocketIntOutput, SocketLongOutput, SocketFloatOutput, SocketDoubleOutput, SocketStringOutput, SocketDateTimeOutput, SocketTimeSpanOutput |
SocketBitInput input;

SocketBitOutput output;

public override void Initialize()
{
   input = CreateSocketBitInput("IN");

   output = CreateSocketBitOutput("OUT");
}
Create a socket by calling the corresponding create method available on the base class. For example, to create a SocketBitInput use the CreateSocketBitInput method.
Node Methods
There are five methods that must be overridden when creating a node.
public override void Initialize()
{ }
public override void Update(long cycleTime)
{ }
public override void Reset()
{ }
public override void Destroy()
{ }
public override void UpdateAsync(long cycleTime)
{ }
Initialize
Method called when a node is added to the diagram. All sockets must be created on this method, use it for additional initialization tasks.
Update
Method called by Connect I/O execution cycle. Override this method with node-specific logic. The argument “cycleTime” is the time passed in milliseconds since the last call to Update.
UpdateAsync
Only available for CustomNodeAsync, called at a periodicity defined by the UpdateRate property (default value is 10 ms). Its execution is controlled by calling the Start and Stop methods. It runs on a separate thread and should be used when executing time-consuming operations. The argument “cycleTime” is the time passed in milliseconds since the last call to UpdateAsync.Reset
Reset
Method called when the diagram is reset. Use this method to reset the node.
Destroy
Method called when the node is removed from the diagram. Use it to free, release or reset resources.
Node Documentation
When a node is selected relevant information is displayed in the Connect I/O properties panel. To create documentation for a node, place a plain text file (.txt) next to the plugins assembly and define the documentation file name with the attribute Documentation.
Sample
This sample shows how to create a CustomNodeAsync to calculate the Fibonacci sequence.
using ConnectIO.Plugins;
using System.Windows.Media;

namespace ConnectIO.Tutorials
{
    //Class attributes
    [Category("Connect I/O Tutorials")]
    [SubCategory("CustomNodeAsync Examples")]
    [Name("Fibonacci")]
    [Documentation("Fibonacci.html")]
    public class Fibonacci : CustomNodeAsync
    {
        //The input socket for the bit to start and stop the calculation
        SocketBitInput calculating;

        //The output socket for the current result of the fibonacci sequence
        SocketLongOutput result;

        //The output socket for the current number of iterations
        SocketIntOutput numberOfIterations;

        //This holds the previous value of the fibonacci sequence
        long previousNumber = 0;

        /// <summary>
        /// Called when the node is added to the diagram
        /// </summary>
        public override void Initialize()
        {
            //Create the inputs sockets and set the inputs label
            calculating = CreateSocketBitInput("Start");

            //Create the output socket and set the output label
            result = CreateSocketLongOutput("Result");
            numberOfIterations = CreateSocketIntOutput("Nr Iterations");

            //Change the update rate to 1000 miliseconds for better visualization of the iterative calculation
            UpdateRateAsyncTask = 1000;

            //Set the initial state of the fibonacci sequence
            previousNumber = 0;
            result.Value = 1;
            numberOfIterations.Value = 0;
        }

        /// <summary>
        /// Called once in each update cycle
        /// </summary>
        public override void Update(long cycleTime)
        {
            //This input socket controls the execution of the "UpdateAsync" method through the Start and Stop methods
            if (calculating.IsLinked)
            {
                if (calculating.Value && !IsRunning)
                {
                    Start();
                }
                else if (!calculating.Value)
                {
                    Stop();
                }
            }
        }

        public override void UpdateAsync(long cycleTime)
        {
            //Fibonacci Sequence iteration
            long temp = previousNumber;
            previousNumber = result.Value;
            result.Value += temp;

            //Increase the iteration counter
            numberOfIterations.Value++;
        }

        /// <summary>
        /// Called when the diagram is reset
        /// </summary>
        public override void Reset()
        {
            //Set the initial state of the fibonacci sequence
            previousNumber = 0;
            result.Value = 1;
            numberOfIterations.Value = 0;
        }

        /// <summary>
        /// Called when the node is removed from the diagram
        /// </summary>
        public override void Destroy()
        {
            //Do nothing
        }
    }
}
How to Debug a Plugin
It is possible to debug code inside a plugin using Microsoft Visual Studio. To debug a node please follow the next steps:
- Start by placing the plugin assembly file in the Connect I/O Plugins folder
-
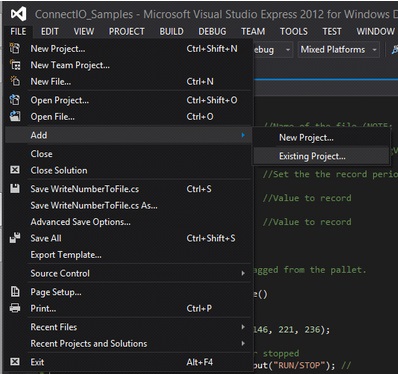
Open the plugins project in Microsoft Visual Studio, click on FILE > Add > Existing Project…
-
Browse to the Connect I/O installation folder and select ConnectIO.exe, next click on Open
-
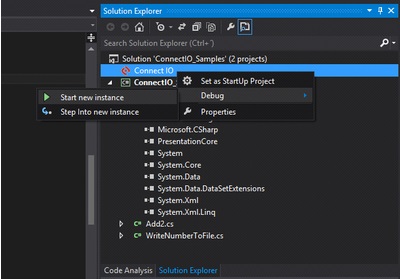
On the Solution Explorer right click on Connect I/O and then on Debug > Start new instance
-
After Connect I/O has started, add the node you wish to debug into the canvas.